Showing posts with label Crafts. Show all posts
4.28.2011
Mexican Paper Flowers
Here’s what you’ll need:
Tissue paper (we bought a multi-color pack from Michaels, but you can find it on Amazon, Dick Blick, Paper Source, Paper Mart, and lots of other places)
Scissors
Stapler, floral wire, or string
The basic concept is EXACTLY the same as the ever-popular “poof”, except you use more than one color and you only pull the tissue paper sheets to one side, instead of both. Instructions below!
1. Cut tissue down to the size you like. 10 x 10″ square (or 12 x 12″) is a good size. Choose three colors, using approx 3 sheets for the middle color and 5 or 6 for each of the other two. Stack ‘em up in the order you’d like the colors to appear in the finished flower.
2. Accordian fold the stack of tissue (just like the poofs).
3. Staple the center of the folded paper a few times so the layers are securely held in place. If you’re using too much paper for your stapler, you can always use floral wire or even just some string instead.
4. Now just like in the poof tutorial, gently pull each piece of tissue towards the center one at a time. Be especially careful with the first few as those seem to be most likely to rip. If you do rip one, don’t worry! You’re going to scrunch the paper up anyway and a ripped sheet will be plenty hidden in the end.
It actually works best if you scrunch the tissue as you go. So maybe finish with the first color and scrunch it up so it looks small and circular enough, then move on to the next color, stopping periodically for more scrunchin’.
That’s it! You can see that you can use any color combo you want for a different look. Create pretty soft flowers using pale pinks and whites, or more traditional flowers using bright colors. You can even create anemones by using black as the center color, or just plain monochromatic poofs for texture around your reception or ceremony space.
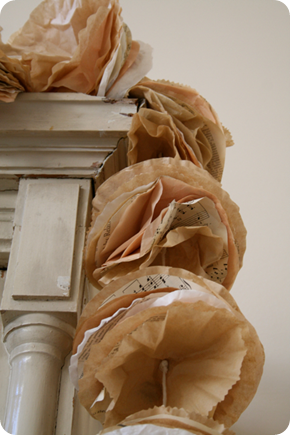
For those of you curious about the recycled newspaper version (or maybe better, pages of old books?), just know that newspaper is thicker than tissue so you don’t need quite as much per flower and it’s a bit harder to work with. We might also suggest wearing gloves if you plan to make a lot of these! Newsprint can be pretty dirty.
Seen on 100 Layer Cake
2.05.2011
1.15.2011
Dishtowel Gifts
1. Take a Dollar Store Flour Sack -- 2/$1. Cut the Four Sack so that it's the same size as a dishtowel by trimming one of the sides to 20 inches in width.
2. Hem the side of the towel by turning it under two times and sewing it. If you have a serger then it's even easier!
3. Measure the width of the bottom of your towel. Fold the edges of the larger piece of material and pin. Then iron the edges under.
4. Make ruffle. Hem the edges of the sides of the longer piece of fabric. Then use your widest stitch setting and make a stitch down the center of the ruffle. Gather the ruffle by pulling on one of the threads.
5. Now lay the large piece of material with the ironed edges on the bottom of the towel with the ruffle on top so that it is just as wide as the material underneath. Then lay the coordinating ribbon over the top. Pin it all in place.
6. Sew along the edges of the large material -- I used a zig zag stitch. Then sew right down the middle of the ribbon.
7. Now you can add bunting if you want. Use a pencil to draw a the lines of the bunting. Then pin and stitch the ric rac or small ribbon on the towel.
8. Make a template -- 1.5" x 1.5" out of cardstock and cut out some triangles out of the coordinating fabric. I put 4-5 pennants on each towel. Add a dab of liquid stitch under each pennant (optional) and pin in place, then stitch each pennant on the towels.
Seen on Ucreate.
1.14.2011
Fabric Pom Poms
Supplies: Fabric, scissors, hot glue gun, and chinese lanterns.
Step 1: Cut circles out of fabric.
Step 2: Fold the circle in half and put a little hot glue on the center, then fold over to secure.
Step 3: Apply more hot glue to the bottom of the folded circle.
Step 4: Press the bottom of the folded circle with the hot glue onto the chinese lantern.
Step 5: Repeat these steps until the whole lantern is covered. Once finished, attached some fabric to the metal frame of the lantern to hang.
Found on Once Wed
Balloon Wreath
Supplies Needed:
1. Have 2 bags of 72 count…the 1 1/2 to 2 inch sized balloons
2. 2 greening pin packs-found at Craft stores in the artificial plant section
3. a straw wreath -leave the plastic on so it doesn’t shed
Take a greening pin, stick the balloon in the middle and push it in nice and tight
Do this over and over and over until the whole wreath is filled in colorful balloons!
Seen on How Does She?
1.13.2011
Ribbon Chandelier
Here is a great ribbon chandelier hanging in a nursery that was inspired by a Pottery Barn Kids version. Seen on Ucreate.
Heart Garland
1. First punch out any and all paper with a heart punch.
2. Fold each heart down the middle.
3. Using double-sided tape (or those little scrapbooking squares), tape the back-sides of three hearts together, to make a 3-dimensional heart.
4. threaded regular, white thread down through the middles and tape it in place on one of the hearts (on the inside), making sure to space the hearts somewhat evenly
1.10.2011
Homemade Slime
*Best for kids ages 3 and up due to the fact that Borax can be toxic if eaten in large quantities
Seen on Leah Profancik Photography
HOMEMADE SLIME
Materials
2 Mixing Bowls
Measuring Cups
Spoons
1 cup Elmer’s Glue
4 tsp Borax
Food Coloring (we tried to make it red, but it wasn’t strong enough and turned pink)
3/4 cup and 1 1/3 cup warm water
- Mix 3/4 cup warm water, 1 cup glue and several drops of food coloring in the first bowl.
- In the second bowl, mix together 4 tsp Borax and 1 1/3 cups warm water.
- Pour contents of first bowl into second bowl, but don’t stir. Let it sit for 1-2 minutes. Lift the now congealed slime out of the bowl.
- Divide the slime.
Seen on Leah Profancik Photography
Subscribe to:
Posts (Atom)