Another Little Man Party! Love the idea of using the song...
What a man, what a man, what a mighty good (little) man.
Seen on Ohdeedoh
Showing posts with label Kids. Show all posts
6.29.2011
4.28.2011
DIY Ladybugs
LADYBUG {or Ladybird} PARTY DECOR
by Jordan Barie
Materials:
Styrofoam balls from craft stores
Red fabric
Dressmaking Pins OR Hot Glue Gun
Black self-adhesive black felt
Pipe cleaners for antennae
Instructions:
1. Cut the styrofoam balls in half using a saw or sharp kitchen knife.
2. Using a plate or other flat round object, trace a circle on the red fabric making sure it’s large enough to cover the dome of the body.
3. Cut out your circles and start wrapping your ladybird body pinning on opposite sides to start with. You could also use a hot glue gun to secure the fabric on the under side.
4. Fold and ease the fabric underneath with as few visible gathers as possible.
5. Cut a circle out of the felt for the head and stick on and wrap one edge underneath
6. Cut a strip of felt for the center of the ladybug’s wings, and dots for her spots.
7. Stick all felt onto the red bodies.
8. Cut the black pipe cleaners in half and curl one end. Insert into the top of the ladybird for antennae.
Seen on Hostess with the Mostess
In the Garden Party
The theme is carried out so well in the food here… from “worms in dirt” {gummy worms buried in cookie crumbs} to cake served in flower pots to adorable toadstool cookies & more.
Theme: DOWN IN THE GARDEN
“I wanted to steer away from the formal dessert table trend and give scope for a complete food table – let the savories in on the fun!
Starting with the guest of honor’s name and some cute DIY ladybird decorations, the background was a rough white wall. With the fake turf tabletop, it gave an “outdoors on the grass” kind of vibe. I used some props that were already weathered from being outdoors throughout the party, which helped play up the rustic-but-clean feel.
FOOD
Food was simple and appealing to little girls (and boys!) at the party. Not too much sugar and nothing too over the top or fancy. One of my favorite details on the food table were the drink bottles. I used miniature milk bottles I found at Bed Bath n Table and covered them with squares of paper wrap, secured with jute string. I cut a cross in the top and popped in a straw just before the food was served. A fresh take on the mini glass bottles and paper straws!
The Dragonfly and Toadstool cookies were designed by Bubble and Sweet to match the invitation perfectly. the mini burgers were also another highlight. Miniature anything is always cuter, I say!
We had ‘mud pie’ ginger kisses, chocolate crackles in pine food cones, cherry ripe cake pots, and ‘worms in dirt’ in a pile that the little guests could dig and serve into their food boats.
The take home treat was a personalized favor box with toadstool cookies inside. Cute!”
Seen on Hostess with the Mostess
3.05.2011
3.02.2011
1.14.2011
Balloon Wreath
Supplies Needed:
1. Have 2 bags of 72 count…the 1 1/2 to 2 inch sized balloons
2. 2 greening pin packs-found at Craft stores in the artificial plant section
3. a straw wreath -leave the plastic on so it doesn’t shed
Take a greening pin, stick the balloon in the middle and push it in nice and tight
Do this over and over and over until the whole wreath is filled in colorful balloons!
Seen on How Does She?
1.13.2011
Ribbon Chandelier
Here is a great ribbon chandelier hanging in a nursery that was inspired by a Pottery Barn Kids version. Seen on Ucreate.
1.10.2011
Homemade Slime
*Best for kids ages 3 and up due to the fact that Borax can be toxic if eaten in large quantities
Seen on Leah Profancik Photography
HOMEMADE SLIME
Materials
2 Mixing Bowls
Measuring Cups
Spoons
1 cup Elmer’s Glue
4 tsp Borax
Food Coloring (we tried to make it red, but it wasn’t strong enough and turned pink)
3/4 cup and 1 1/3 cup warm water
- Mix 3/4 cup warm water, 1 cup glue and several drops of food coloring in the first bowl.
- In the second bowl, mix together 4 tsp Borax and 1 1/3 cups warm water.
- Pour contents of first bowl into second bowl, but don’t stir. Let it sit for 1-2 minutes. Lift the now congealed slime out of the bowl.
- Divide the slime.
Seen on Leah Profancik Photography
Girls Pom Poms
I posted last week about some pom poms above a little girls bed. Here is another picture that have the pom poms coming down the corner. Love the mix of textures. Seen on Ohdeedoh.
Kids Art
This is great wall art for a kids room. Seen on Finding My Feet
{Sources}
2. Metal Print of Oliver and Bea in the doorway printed on metal by MpixPro
3. Oliver's monogram by Uncle Caleb
4. Canvas gallery wrap of Oliver at Aretha Frankenstein's printed on canvas by MpixPro
1.05.2011
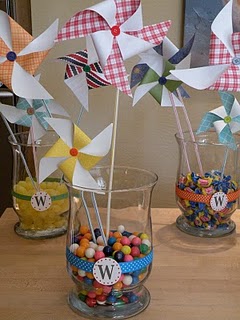
DIY Pinwheels
Depending on the size pinwheels you want, cut perfect squares out of decorative paper. NOTE: both sides will show, so use a paper that is decorative on both sides, solid, or at least solid white on the back. I made 3 sizes shown above in the pictures:
- X-Large Pinwheels: 8 x 8 inches
- Large Pinwheels: 7x7 "
- Medium Pinwheels: 5 x 5 "
- Small Pinwheels: 4 x 4 "
First cut out your perfect square, then cut in a line from each one of the corners to the center of the square, stopping about an inch or two from the center. A paper cutter works great for this and made it go really quickly.
Next, put a dime size hot glue in the very center of the square and pull in one side of each corner (practice before your put the glue down.)
Hold it there with your finger for a minute until it dries.
Add a button or brad to give it a finished look. With a glue gun, attach a straw, skewer, or dowel to the back of the pinwheel. We were actually able to attach our straws to the inside of one of the loops of the pinwheels so that the back of them looked more finished.
If you use straws, you can stick one inside the other to give it more length and you can also cut them to different heights very easily so that you can display them at your liking!
Seen on Creative Juices.
3.28.2010
Subscribe to:
Posts (Atom)