1.10.2011

Snickers Cupcake

I haven't made these yet but I want to right away!


Decadent Snickers Cupcakes
with Chocolate Mousse Filling

1 box Devils Food Cake Mix
1 small box Jello Chocolate Fudge instant pudding mix
4 eggs
1/2 cup vegetable oil
1 cup milk
1 cup sour cream
Chocolate Mousse Filling
2 cups heavy whipping cream
2 cups milk chocolate chips
Chocolate Buttercream Frosting
1 stick softened butter
2 1/2 to 3 cups powdered sugar
1/4 cup cocoa powder
1/2 tsp vanilla
1 bag mini Snickers
1. Preheat oven to 350 degrees F. Line 24 cupcake tins with liners. To prepare the cupcakes, place the cake mix, pudding mix, eggs, oil, milk and sour cream into stand mixer. Beat until well combined, about 2 minutes. Scoop the batter evenly into the cupcake liners. Bake for 20-25 minutes or until cupcakes are cooked through and a toothpick comes clean from center. Remove the cupcakes from the tin and let cool.
2. To prepare the mousse, melt the milk chocolate chips in the microwave, stirring every 30 seconds. Set aside to cool. Meanwhile, whip the heavy cream with a stand or electric mixer until it looks like whipped cream and stiff peaks form. Fold melted chocolate chips into whipped cream until well combined, then transfer batches into a piping bag. When cupcakes have cooled, press the tip of the piping bag into the center of the cupcake, about 1 inch deep. Squeeze the mousse into the cupcake while pulling the tip out. It doesn’t take much, just one firm squeeze is perfect. Continue filling all the cupcakes.
3. To prepare the frosting, beat the butter, powdered sugar, cocoa and vanilla until well combined and a nice frosting consistency. Spread over cupcakes then top with chopped Snickers.
Makes 24 cupcakes.

Seen on Kevin & Amanda

Stenciled Bath


Seen on Isabella & Max Rooms. She had the stencil made at Whitewall & Co.

Month Picture

We took a picture of my daughter every month for her first year but I loved this couples idea to take a picture each month with the mama and dada!  Seen on The Langs.

Beautiful Bath


In my dreams this is what my bath looks like!  Love the marble on the wall and the penny tiles on the floor...bliss.  Seen on the Adventures in Renovating.

San Francisco Wedding


Seen on Style Me Pretty.

Girls Pom Poms

I posted last week about some pom poms above a little girls bed.  Here is another picture that have the pom poms coming down the corner.  Love the mix of textures.  Seen on Ohdeedoh.

Kids Art


This is great wall art for a kids room.  Seen on Finding My Feet

{Sources}
1. "Get Wellies Soon" screen print and "Keep Calm and Carry On" giclee print by BluLima on Etsy
2. Metal Print of Oliver and Bea in the doorway printed on metal by MpixPro
3. Oliver's monogram by Uncle Caleb
4. Canvas gallery wrap of Oliver at Aretha Frankenstein's printed on canvas by MpixPro
5. "I {heart} Michigan" print by The Wheatfield on Etsy

1.05.2011

Necklace

I have been looking for a necklace like this for years...maybe one day I'll find one that isn't an arm and a leg. Seen on Jose Villa.

Banff Wedding


Seen on Jose Villa

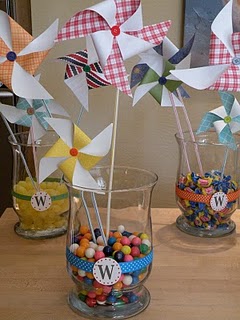
DIY Pinwheels

Depending on the size pinwheels you want, cut perfect squares out of decorative paper. NOTE: both sides will show, so use a paper that is decorative on both sides, solid, or at least solid white on the back. I made 3 sizes shown above in the pictures:
  • X-Large Pinwheels: 8 x 8 inches
  • Large Pinwheels: 7x7 "
  • Medium Pinwheels: 5 x 5 "
  • Small Pinwheels: 4 x 4 "
First cut out your perfect square, then cut in a line from each one of the corners to the center of the square, stopping about an inch or two from the center. A paper cutter works great for this and made it go really quickly.
 
Next, put a dime size hot glue in the very center of the square and pull in one side of each corner (practice before your put the glue down.)
 
Hold it there with your finger for a minute until it dries.

Add a button or brad to give it a finished look. With a glue gun, attach a straw, skewer, or dowel to the back of the pinwheel. We were actually able to attach our straws to the inside of one of the loops of the pinwheels so that the back of them looked more finished.
 
If you use straws, you can stick one inside the other to give it more length and you can also cut them to different heights very easily so that you can display them at your liking!
 

Hanging On

Baby on White

I thought that the hard white surface is a great look. I have used the white sheet with my daughter many times but it always looks like it needs ironed! Seen on Ashley Thalman Photography.


Baby as Art


DIY Boutonnieres

A creative way to save some money on flowers.
      To create the yellow boutonniere:
    • 1. Collect silver and yellow buttons of all sizes and shapes.
    • 2. Arrange them one on top of the other to form mini arrangements resembling flowers. Use a green wire (fishing wire or those carried at craft stores works well) to thread through the buttons, holding them all together.
    • 3. Gather all of the "stems" of your new little button flowers and wrap the green wire around it over and over to create volume.
    • 4. Attach a safety pin to the back and you've got a little bouquet of buttons!
    For the blue and white boutonnieres:
  • 1. Gather fabric covered buttons with similar colors in a variety of patterns.
  • 2. Cut out a little leaf shape out of a neutral color fabric (which should be the same for all of the boutonnieres).
  • 3. Thread together the back of the buttons, attaching them to the leaf.
  • 4. Take thin green ribbon and cover a short stick or bundle of toothpicks to create the stem.
  • 5. Sew or tie the bundle of buttons to the top of the stick, creating the buds.
  • 6. Attach a safety pin to the back and you're all set!

    For the stem-less flower:
  • 1. Cut eight pieces of ribbon, 5 inches long. Pick a cute pattern as this will be the “petals” and the main focus of the boutonniere.
  • 2. Loop over the ribbon, gathering all of the ends in the middle. (A tip: it helps if you glue or sew the ends down to a small piece of cardboard so they stay together.)
  • 3. Glue a similar colored button to the center of the ribbon so the ends are hidden.
  • 4. Glue the safety pin to the back of the cardboard.
  • 5. For reinforcement, go back and sew all of the parts together right through the middle.
Seen on DIY Wedding Day.

Special Date

Here is a great way to decorate with an special date.  Seen on DIY Wedding Day.

Card Options

Oh, what you can do to a simple card!!!

Rounded corners-

Layer with accent color paper-


Glitter Edge-


Watercolor Edge-


Head to Jones Design Company for a detail description on the how to steps!

Balloon

Print by Max Wanger.

Girl's Room


I love the collection of pom-poms and balls above the bed!  Seen on Under the Sycamore.

Birch

Isn't this amazing?  Perfect for a fall or winter wedding!  Seen on Intimate Weddings.

Place to Organize

A great way to get organized in the New Year.  Love the quote on the bottom as well.